Tuesday, May 21, 2013

TCP-WRAPPER


                                        TCP-WRAPPER


Two files which is used for tcp-wrappers

1> ls /etc/hosts.allow
2> ls /etc/hosts.deny


NOTE :- tcp-wrappers will control only that services which are dependent on
-----  `libwrap.so` library.

#which vsftpd  ---> ( it will show the binary location of the vsftpd )

# ldd /usr/bin/vsftpd  ----> ( this ldd command will show the dependency list )

# strings /usrlib/libwrap.so | less   ----> ( to read the library )

# man 5 hosts_access    ----> ( man page for tcp-wrappers )


# vim /etc/hosts.deny

vsftpd:ALL  ------> deny service to everyone

vsftpd:ALL EXCEPT .example.com  

vsftpd:ALL EXCEPT 192.168.1.25

vsftpd:192.168.1.0/255.255.255.0

vsftpd:.yahoo.com

sshd,vsftpd:.yahoo.com     ----> ( for ssh & vsftpd )

ALL:ALL          -----> ( this is for all service for all daemon )

--------------------------------------------------------------------------------

SHELL COMMAND :-
################

1> SPAWN:- When connection will stablish to access the main daemon `spawn` will     execute the process which is given after spawn as a child process


# vim /etc/hosts.allow
 vsftpd:ALL:spawn /bin/echo `/bin/date` from %h >> /var/log/abc.log


2> TWIST:- If the twist is given as shell command & even if it is mentioned in   /etc/hosts.allow file. It will not allow access of main daemon, instead of that it will execute the process which is given after twist.

# vim /etc/hosts.allow
vsftpd:ALL:twist /bin/echo "Bad hosts are not allowed"


Wednesday, May 15, 2013

Xinetd TCP Super-Server Daemon


The xinetd TCP Super-Server Daemon


* xinetd.conf is the config file that determines the services provided by
  xinetd.   
 
* xinetd starts programs that provide Internet services. 

* Instead of having such servers  started  at system  initialization time, and
  be dormant until a connection request arrives, xinetd is the only daemon
  process started and it listens on all service ports for the services listed
  in its configuration file, which have been enabled !
 
* When a request comes in, xinetd starts the appropriate server. Because of
  the way it operates, i.e once server starts another one,
  xinetd is also referred to as a Super-Server.
 
* And since all these connections are TCP, is also called TCP Super-Server
  daemon

                                                                 xinetd services
                                                                            |                    
     --------------------------------------------------------------------------------------------------------
     |                                                                                                                              |
  single-threaded                                                                                        multi-threaded

  * xinetd starts Server-A                                            * xinetd forks a new server on every
  * Server-A services client requests                          request
  * xinetd listens on Port-A and                                 * This new child server handles the
    starts new Server-As if reqd                                    connection
                                                                                           * xinetd just listens for requests
                                                                                              and keeps on forking servers


* The services listed in xinetd’s configuration  file can be  separated into two
  groups. Services in the first group are called multi-threaded and they
  require the forking of a new server process for each new  connection request.
 
* The new server then handles that connection. For such services, xinetd keeps
  listening for new requests so that it can spawn new servers. 
 
* On the other hand, the second group includes services for which the service
  daemon is responsible for handling all new connection requests.  
 
* Such services are called single-threaded and xinetd will stop handling new
  requests for them until the server dies. Services in this group are usually
  datagram-based.

* So far, the only reason for the existence of a super-server was to conserve
  system resources by avoiding forking a lot of processes which might be dormant
  for most of their lifetime.   
 
* While fulfilling this function, xinetd takes advantage of the idea of a
  super-server to provide features such as access control and logging. 
 
  Furthermore, xinetd is not limited to services listed in /etc/services.
  Therefore, anybody can use xinetd to start special-purpose servers.

* Each entry defines a service identified by the service_name.

  The following is a list of available attributes:

  
Note : Do not forget to check out the 10 examples at the end. 
List of attributes configurable in /etc/xinetd.conf 

Critical 19 to concentrate on !

1. Global
   ------
       1 includedir   /etc/xinetd.d/

2. Daemons/Servers
   ---------------
       2 server   
       3 port      [swat]

3. Load Balancing :
   --------------
       4 disable       yes / no
       5 instances     5
       6 cps           30 30
       7 flags =       NOLIBWRAP
      
4. Access Control
   --------------
       8 only_from     IP/NW, host/domain
       9 no_access     IP/NW, host/domain
      10 access_times  9:00-1300 1400-1700
      11 per_source    1 or UNLIMITED
      12 bind          192.168.0.20     
      13 interface [aka bind]

5. Logging
   -------
      14 log_type       SYSLOG  facility.level

facility
 
daemon     system daemons w/o separate facility value auth       deprecated
                   authpriv   security/authorization messages (private)
                   user       (default) generic user-level messages
                   mail       mail subsystem
                   lpr        line printer subsystem
                   news       USENET news subsystem
                   uucp       UUCP subsystem
                   ftp         ftp daemon
                   local0-7.   reserved for local use
              
               Eg 1. Put *.* /dev/tty12 in /etc/syslog.conf
                  2. Restart syslog
                  and access your /var/log/messages on tty12
               Eg Put local5.*  /var/log/greetings or /dev/tty6
                  # logger -p local5.info "Hi from me"
                    will create/log this msg to this file or tty6
                Useful if called from shell prgs
                         
              level
                          =====
                          This  determines  the  importance  of  the message. 
                      The levels are, in order of decreasing importance:

                          Possible level names include:     
         
                      emerg    system is unusable
                  alert    action must be taken immediately
                  crit     critical conditions
                  err      error conditions
                  warning  warning conditions
                      notice   normal, but significant, condition   
                  info     informational message
                  debug    debug-level message


      15 log_on_success            PID HOST USERID EXIT DURATION
      16 log_on_failure            HOST USERID ATTEMPT

      17 banner file_name          file - shows always on connection
      18 banner_success file_name  file - shown on successful connect
      19 banner_fail file_name     file - shown if access if DENIED

-------------------------------------------------------------------------------
The config file for xinetd daemon :

                            =======================
                            Canned /etc/xinetd.conf
                            =======================

defaults
{
  instances               = 60   
  log_type                = SYSLOG authpriv     
  log_on_success          = HOST PID
  log_on_failure      = HOST
  cps              = 25 30
}
includedir /etc/xinetd.d

                         -------------------------
                         DIRECTIVES OF XINETD.CONF
                         -------------------------

                                  ------
                               1. Global
                                  ------

-------------------------------------------------------------------------------
1      includedir    Takes  a  directory  name  in  the form of "includedir
            /etc/xinetd.d".     Every    file  inside  that  directory,
            excluding  files  with names containing a dot (’.’) or
            ending with a tilde (’~’), will be  parsed  as    xinetd
            configuration  files.    The  files  will  be parsed in
            alphabetical order according to     the  C     locale.  This
            allows    you  to specify services one per file within a
            directory.  The includedir directive may not be speci-
            fied from within a service declaration.
-------------------------------------------------------------------------------
                              ---------------
                           2. Daemons/Servers
                              ---------------

-------------------------------------------------------------------------------
2. server        Determines the program to execute for this service.
-------------------------------------------------------------------------------
3.  port        Determines the service    port.  If  this     attribute  is
            specified  for    a  service listed in /etc/services, it
            must be equal to the port number listed in that     file.

                            --------------
                         3. Load Balancing :
                            --------------

-------------------------------------------------------------------------------
4. disable        This  is  boolean  "yes" or "no".  This will result in
            the service being disabled and not starting.  See  the
            DISABLE flag description.
-------------------------------------------------------------------------
5. instances            Determines  the number of servers that can be simulta-
            neously active    for  a    service     (the  default    is  no
            limit).     The  value  of this attribute can be either a
            number or UNLIMITED  which  means  that     there    is  no
            limit.
-------------------------------------------------------------------------------
6. cps                Limits the rate of incoming  connections.   Takes  two
            arguments.   The  first argument is the number of con-
            nections per second to handle.    If the rate of    incom-
            ing  connections is higher than this, the service will
            be temporarily disabled.  The second argument  is  the
            number    of seconds to wait before re-enabling the ser-
            vice after it has been disabled.  The default for this
            setting is 50 incoming connections and the interval is
            10 seconds.
-------------------------------------------------------------------------------
7. flags = NOLIBWRAP
-------------------------------------------------------------------------------

                       --------------
                    4. Access Control
                       --------------

-------------------------------------------------------------------------------
08 only_from
                        determines  the     remote     hosts to which the particular
            service is available.  Its  value  is  a  list    of  IP
            addresses which can be specified in any combination of
            the following ways:

            a)   a numeric address in the form of %d.%d.%d.%d.  If
                 the  rightmost components are 0, they are treated
                 as wildcards (for example,     128.138.12.0  matches
                 all  hosts     on  the  128.138.12 subnet).  0.0.0.0
                 matches all Internet addresses.  IPv6  hosts  may
                 be specified in the form of abcd:ef01::2345:6789.
                 The rightmost rule for IPv4  addresses  does  not
                 apply to IPv6 addresses.

            b)   a      factorized    address      in   the   form   of
                 %d.%d.%d.{%d,%d,...}.  There is no need for all 4
                 components (i.e. %d.%d.{%d,%d,...%d} is also ok).
                 However, the factorized part must be at  the  end
                 of the address.  This form does not work for IPv6
                 hosts.

            c)   a network name (from  /etc/networks).  This  form
                 does not work for IPv6 hosts.

            d)   a    host  name.   When  a  connection  is  made to
                 xinetd, a reverse lookup is  performed,  and  the
                 canonical name returned is compared to the speci-
                 fied host name.  You may also use domain names in
                 the  form    of .domain.com.     If the reverse lookup
                 of the client’s IP is within .domain.com, a match
                 occurs.

            e)   an     ip  address/netmask  range  in     the  form  of
                 1.2.3.4/32.  IPv6 address/netmask ranges  in  the
                 form of 1234::/46 are also valid.

            Specifying  this  attribute  without a value makes the
             service available to no-one.
-------------------------------------------------------------------------------
09 no_access
                        Determines the remote hosts to    which  the  particular
            service     is unavailable. Its value can be specified in
            the same way as the value of the only_from  attribute.
            These  two  attributes    determine  the location access
            control enforced by xinetd. If    none  of  the  two  is
            specified  for    a service, the service is available to
            anyone. If both are specified for a service,  the  one
            that is the better match for the address of the remote
            host determines if the service is  available  to  that
            host  (for  example,  if  the  only_from list contains
            128.138.209.0  and   the   no_access   list   contains
            128.138.209.10     then    the   host  with  the  address
            128.138.209.10 can not access the service).
-------------------------------------------------------------------------------
10 access_times
                    Determines the time  intervals    when  the  service  is
            available.  An interval has the form hour:min-hour:min
            (connections will be accepted  at  the    bounds    of  an
            interval).  Hours  can    range from 0 to 23 and minutes
            from 0 to 59.

                        eg  access_times = 9:00-1300 1400-1700
-------------------------------------------------------------------------------
11 per_source
                        Takes  an integer or "UNLIMITED" as an argument.  This
            specifies the maximum instances of  this  service  per
            source    IP address.  This can also be specified in the
            defaults section.
-------------------------------------------------------------------------------
12 bind               
                        Allows    a  service to be bound to a specific interface
            on the machine.     This means  you  can  have  a    telnet
            server    listening  on  a local, secured interface, and
            not on the external interface.    Or  one     port  on  one
            interface  can    do something, while the same port on a
            different interface can do something  completely  dif-
            ferent.     Syntax: bind = (ip address of interface).
-------------------------------------------------------------------------------
13  interface    Synonym for bind.
-------------------------------------------------------------------------------

                             --------
                          5. Logging
                             -------
-------------------------------------------------------------------------------
14 log_type   
                 Determines where the service log output is sent. There
        are two formats:

    SYSLOG    syslog_facility [syslog_level]
   
           The  log output is sent to syslog at the specified facility.
        The facility arg is used to specify what type of prg is logging
        the  message. 
           This lets the config file specify that messages from different
           facilities will be handled differently
       
        Possible facility names include:
                 ========
       facility
       ========
          daemon,     system daemons without separate facility value
          auth,
          authpriv,   security/authorization messages (private)
          user,       (default) generic user-level messages
          mail,       mail subsystem
          lpr,        line printer subsystem
          news,       USENET news subsystem
          uucp,       UUCP subsystem
          ftp         ftp daemon
          local0-7.   reserved for local use

            level
        =====
            This  determines  the  importance  of  the message. 
        The levels are, in order of decreasing importance:

              Possible level names include:   
         
              emerg,    system is unusable
          alert,    action must be taken immediately
          crit,        critical conditions
          err,      error conditions
          warning,  warning conditions
              notice,   normal, but significant, condition   
          info,     informational message
          debug.    debug-level message

        If  a  level is not present, the  messages will be recorded at the
            info level.

      FILE  file [soft_limit [hard_limit]]        
         The log output is appended to file  which  will be  created if it does
         not exist.  Two limits on  the size of the log  file  can be optionally
         specified.
         The first limit is  a soft one;
            xinetd will log a message the first  time  this limit  is  exceeded
            (if xinetd logs to syslog, the message will be sent at the alert
             prioritylevel).
         The second limit is a hard limit;    
            xinetd will stop logging for the affected  service  (if  the  log 
            file is a common log file, then more than one service may be
        affected) and will log a message about this (if xinetd logs to
        syslog, the message  will  be sent  at the alert  priority level).
        If a hard limit is not specified, it  defaults to  the  soft limit.

-------------------------------------------------------------------------------
15. log_on_success    Determines what information is logged when a server is
            started and when that server exits (the service id  is
            always included in the log entry).  Any combination of
            the following values may be specified:

            PID        logs the server process id (if the service
                    is    implemented  by xinetd without forking
                    another process the logged process id will
                    be 0)

            HOST        logs the remote host address

            USERID        logs  the user id of the remote user using
                    the     RFC  1413  identification   protocol.
                    This  option  is available only for multi-
                    threaded stream services.

            EXIT        logs the fact that a server     exited     along
                    with  the  exit  status or the termination
                    signal (the process id is also  logged  if
                    the PID option is used)

            DURATION    logs the duration of a service session
-------------------------------------------------------------------------------
16. log_on_failure    Determines  what  information  is logged when a server
            cannot    be  started  (either  because  of  a  lack  of
            resources  or because of access control restrictions).
            The service id is always included  in  the  log     entry
            along with the reason for failure.  Any combination of
            the following values may be specified:

            HOST        logs the remote host address.

            USERID        logs the user id of the remote user     using
                    the      RFC  1413  identification  protocol.
                    This option is available only  for    multi-
                    threaded stream services.

            ATTEMPT        logs  the  fact  that a failed attempt was
                    made (this option is implied by  all  oth-
                    ers).
-------------------------------------------------------------------------------
17  banner        Takes  the name of a file to be splatted at the remote
            host when a connection to that service is established.
            This  banner  is printed regardless of access control.
            It should *always* be printed when  a  connection  has
            been made.
-------------------------------------------------------------------------------
18 banner_success    Takes  the name of a file to be splatted at the remote
            host when a connection to  that     service  is  granted.
            This  banner  is  printed as soon as access is granted
            for the service.
-------------------------------------------------------------------------------
19 banner_fail            Takes the name of a file to be splatted at the    remote
            host  when  a  connection  to  that service is denied.
            This banner is    printed     immediately  upon  denial  of
            access.      This is useful for informing your users that
            they are doing something bad  and  they     shouldn’t  be
            doing it anymore.
-------------------------------------------------------------------------------
                                

Tuesday, May 14, 2013

CRON Scheduler:


CRON Scheduler


                           /    Cron
Schedulers <
                           \    Anacron


CRON
  
                  Scheduler for Unix based systems, used in all Unix flavors such as IBM-AIX, HP-UX, Sun Solaris, Linux (RedHat, Suse, Mandrake, Debian etc.).

A crown is a server which came in the RAM at the time of bootup and remains there till system shutdowns. It gets activated every one minute and on activate it does three things.


1. It reads its configuration file /etc/crontab and does as per instructed.

Environmental Variables for crond
---------------------------------
SHELL=/bin/bash
PATH=/sbin:/bin:/usr/sbin:/usr/bin
MAILTO=root
HOME=/


Time  As User Instruction Argument (Optional)
01 * * * * root run-parts /etc/cron.hourly
02 4 * * * root run-parts /etc/cron.daily
22 4 * * 0 root run-parts /etc/cron.weekly
42 4 1 * * root run-parts /etc/cron.monthly
 
 
1st star    -> Minute (00-59)
2nd star    -> Time   (00-23)
3rd star    -> Date    (1-31)
4th star    -> Month  (1-12)
5th star    -> Day      (0-7)


2. It goes into /etc/cron.d and opens each file and does as per instruction.

3. It goes into /var/spool/cron and opens each file and does as per instruction.


ANACRON:
   Anacron is also a scheduler but only in RedHat Linux. It is an extension to
cron. Whatever jobs are left by cron is completed by anacron.

Anacron's configuration file is /etc/anacrontab


Monday, May 13, 2013

CREATE FTP ACCOUNT ON WINDOWS SERVER 2003


How to create FTP Account on windows server 2003.


Go to the 'Computer Management' tool under Start -> Control Panel -> Administrative Tools:

Computer Management

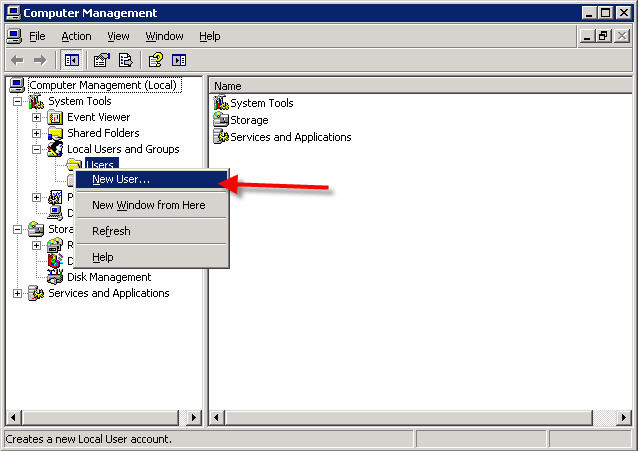
Expand the 'Local Users and Groups' folder and right-click on 'Users' and select 'New User.

New User

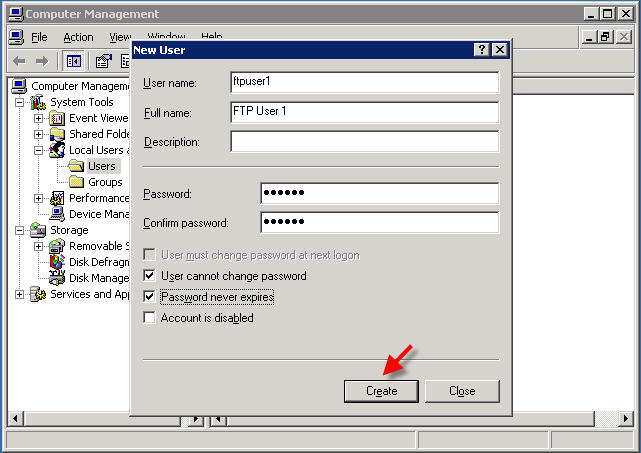
Fill in the information for your new user and then click 'Create':

Add user

After you click 'Create' you will still be on the same screen (blank, so that you can add another user if needed). Press 'Close' to exit this screen.
Now you will need to give this new  user permissions for the folder, so navigate to the directory you would like the user to
be able to access through the web or FTP.
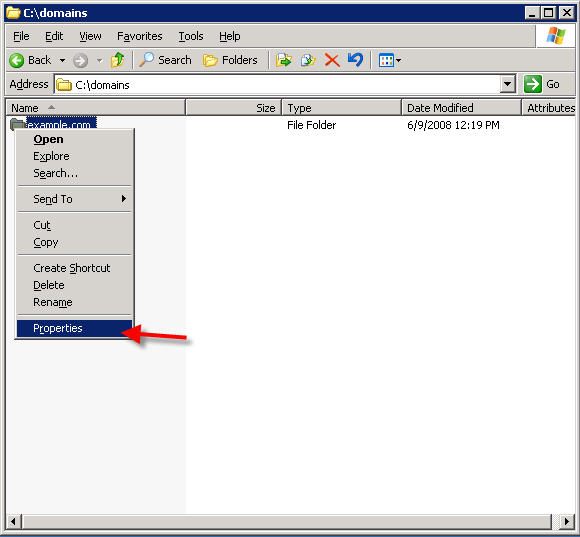
Right-click on the folder and click 'Properties':

folder properties

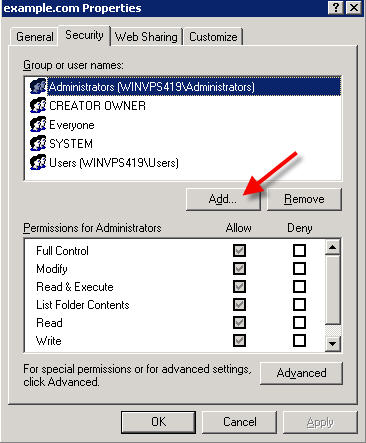
Now select the 'Security Tab' and click the 'Add' button:


Click the 'Locations' button and select your server name (if it is not already listed)
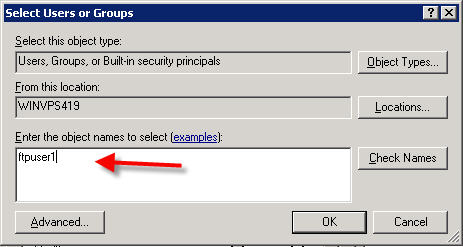
 Type the name of your new user in the 'Enter the object names to select' box and click OK:


Then adjust the permissions that you want for this user by clicking on the appropriate check-boxes in the Permissions window, and press 'Apply'.
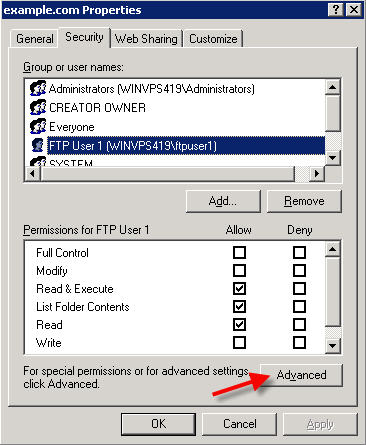
Now click on the 'Advanced' button:


Make sure both check-boxes at the bottom are checked. This will reset all permissions on that folder and ensure that the new user  has access to the files and folders inside that folder.  Press 'Apply' to  confirm.

Now we need to create an entry under IIS so that the user can login through FTP.

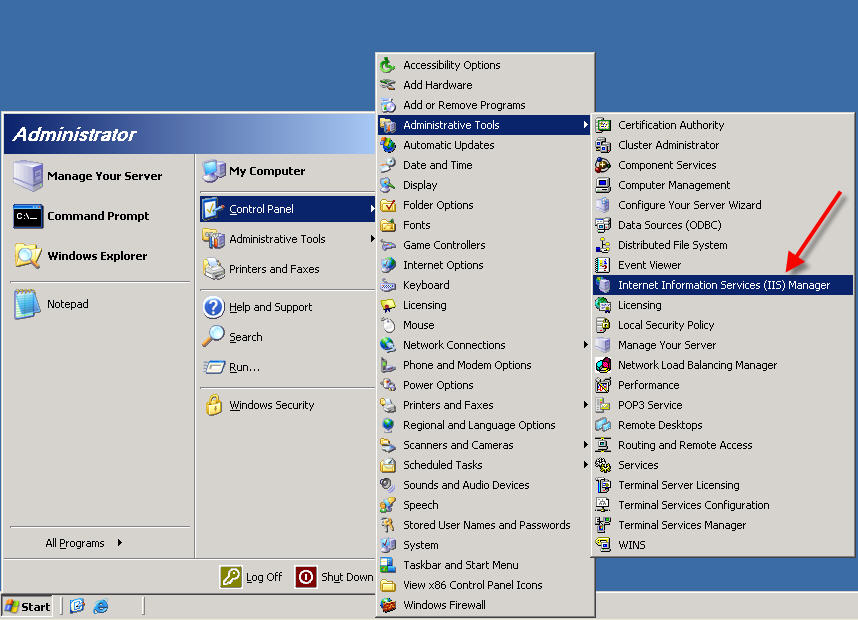
To create the Virtual Directory for the FTP user, open IIS and navigate to FTP Sites:


If your server has just been set up, we recommend that you disallow anonymous connections on the Default FTP Site:
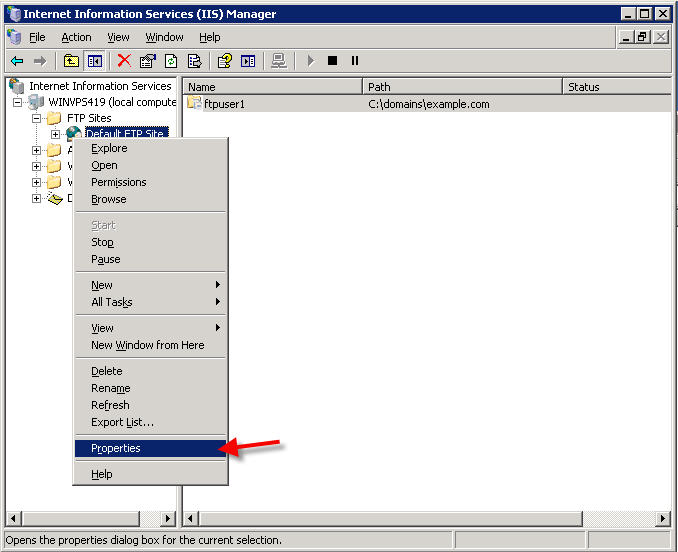
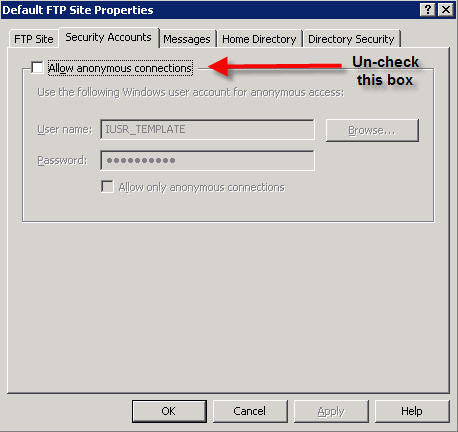
Expand the 'FTP Sites' folder and right-click on 'Default FTP Site' and select 'Properties':

Default FTP site properties

Click on the 'Security Accounts' tab, and UN-check the box 'Allow anonymous connections'

Disable Anonymous access

Press OK.

Now you are ready to add FTP/Web users to your server:
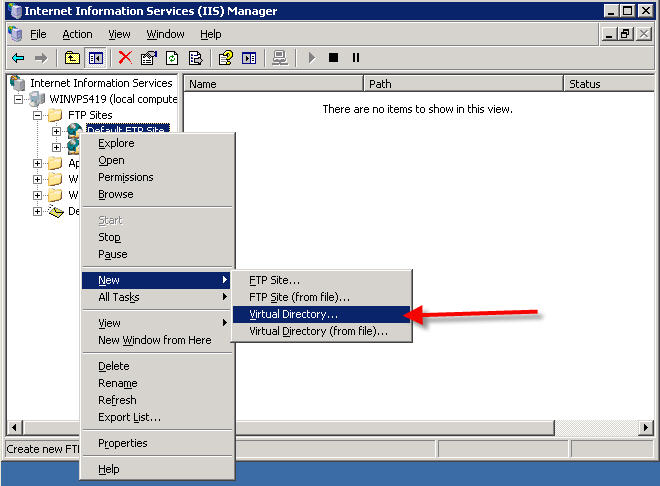
Right-click on the 'Default FTP Site' folder and select New --> Virtual Directory:


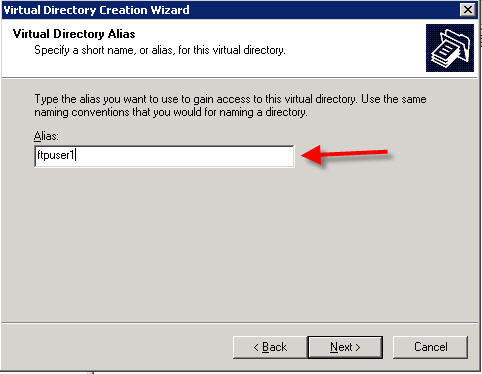
Follow the Wizard to complete the entry. Make sure that the alias of the virtual directory is the exact same name as the username you added earlier:

virtual directory wizard

(In the above example we created a new user named "ftpuser1" so we are using the exact same name above)
Click 'Next'
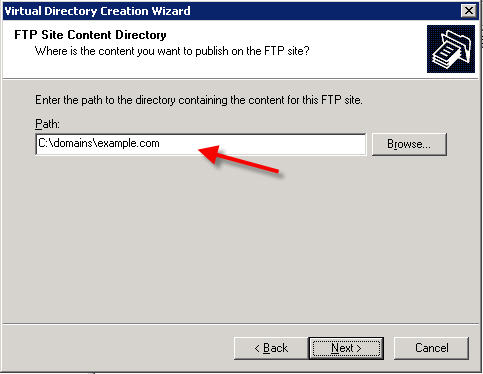
Now just browse to the directory this FTP user should have access to. Normally this is the home directory for the web site:

FTP directory

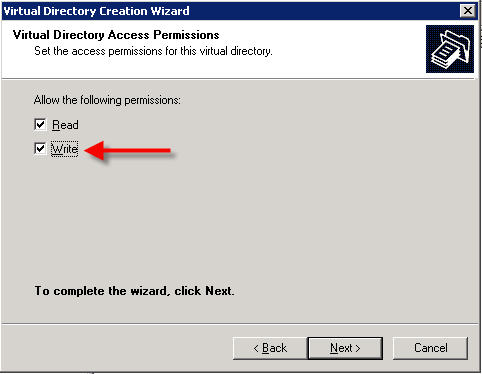
On the next screen, be sure to add a checkmark next to "Write" if you want your FTP user to be able to have access to upload/delete/modify files:

Wizard - write access

Click 'Next' and then 'Finish'

Saturday, May 11, 2013

PHP Strict Standards: date() system's timezone settings

 
Messages in HTTP/Apache error_log: We have got date.timezone error in PHP.


PHP Strict Standards: date() [<a href='function.date'>function.date</a>]: It is not safe to rely on the system's timezone settings. Please use the date.timezone setting, the TZ environment variable or the date_default_timezone_set() function. In case you used any of those methods and you are still getting this warning, you most likely misspelled the timezone identifier.


Edit your PHP.INI using below command.


# vim /etc/php.ini
Change this:

[Date]
; Defines the default timezone used by the date functions
; date.timezone =
To this:


[Date]
; Defines the default timezone used by the date functions
date.timezone = "Asia/Calcutta"


This will resolve the problem.

Friday, May 10, 2013

install DNS server in Linux


                                                                DNS SERVER

1) How to install DNS server:

Domain Name System (or Service or Server), an Internet service that translates domain names into IP addresses. Because domain names are alphabetic, they're easier to remember. The Internet however, is really based on IP addresses. Every time you use a domain name, therefore, a DNS service must translate the name into the corresponding IP address.


Linux DNS (BIND) Configuration
Hostname:dns
Domain name:example.com
Full domain Name:dns.examle.com
Red line show the changes of the file

Make sure system ip has been static If not make a static

[root@dns ~]# system-config-network
[root@dns ~]# service network restart

Step- 1: On Dns Server install bind and caching server RPM Packages using yum or rpm

[root@dns ~]# yum install bind* caching-nameserver*
Check server installed

[root@dns ~]# rpm -qa | grep bind*
ypbind-1.19-7.el5
bind-utils-9.3.3-7.el5
bind-9.3.3-7.el5
bind-libbind-devel-9.3.3-7.el5
bind-libs-9.3.3-7.el5
bind-sdb-9.3.3-7.el5
bind-devel-9.3.3-7.el5
binutils-2.17.50.0.6-2.el5
bind-chroot-9.3.3-7.el5

[root@dns ~]# rpm -qa | grep caching-nameserver
caching-nameserver-9.3.3-7.el5

Step 2:- Go to /var/named/chroot/etc/ Directory 

[root@dns ~]# cd /var/named/chroot/etc/
[root@dns etc]# pwd
/var/named/chroot/etc

[root@dns etc]# ll -lrt
total 48
-rw-r----- 1 root named 1100 Jan 17 2007 named.caching-nameserver.conf
-rw-r--r-- 1 root root 109 Apr 18 20:55 localtime
-rw-r--r-- 1 root named 113 Apr 18 21:20 rndc.key
-rw-r----- 1 root named 954 Apr 18 21:47 named.rfc1912.zone

Step 3:- copy named.caching-nameserver.conf to named.conf 

[root@dns etc]# cp named.caching-nameserver.conf named.conf

Step 4:- Edit named.conf file 

[root@dns ~]# vi named.conf
//
// named.caching-nameserver.conf
//
// Provided by Red Hat caching-nameserver package to configure the
// ISC BIND named(8) DNS server as a caching only nameserver
// (as a localhost DNS resolver only).
//
// See /usr/share/doc/bind*/sample/ for example named configuration files.
//
// DO NOT EDIT THIS FILE - use system-config-bind or an editor
// to create named.conf - edits to this file will be lost on
// caching-nameserver package upgrade.
//
options {
listen-on port 53 { 192.168.1.2; }; ( CHANGE YOUR DOMAIN SERVER IP)
# listen-on-v6 port 53 { ::1; };(COMMENT ON THAT LINE)
directory "/var/named";
dump-file "/var/named/data/cache_dump.db";
statistics-file "/var/named/data/named_stats.txt";
memstatistics-file "/var/named/data/named_mem_stats.txt";
query-source port 53;
query-source-v6 port 53;
allow-query { any; }; (MAKE A ANY)
};
logging {
channel default_debug {
file "data/named.run";
severity dynamic;
};
};
view localhost_resolver {
match-clients { any; }; (MAKE A ANY)
match-destinations { 192.168.1.2; }; (CHANGE YOUR DOMAIN SERVER IP)
recursion yes;
include "/etc/named.rfc1912.zones";

SAVE AND QUITE THE named.conf

Step 5:- Change ownership of named.conf 

[root@dns etc]# chown root:named named.conf

[root@dns etc]# ll named.conf
-rw-r----- 1 root named 1093 Apr 18 21:31 named.conf 


Step 6:- Edit named.rfc1912.zones for Zone

[root@dns etc]# vi named.rfc1912.zones
// named.rfc1912.zones:
//
// Provided by Red Hat caching-nameserver package
//
// ISC BIND named zone configuration for zones recommended by
// RFC 1912 section 4.1 : localhost TLDs and address zones
//
// See /usr/share/doc/bind*/sample/ for example named configuration files.
//
zone "." IN {
type hint;
file "named.ca";
};
zone "example.com" IN { (CHANGE YOUR DOMAIN NAME)
type master;
file "forword.zone"; (CHANGE YOUR FORWORD ZONE FILE NAME)
allow-update { none; };
};
zone "localhost" IN {
type master;
file "localhost.zone";
allow-update { none; };
};
zone "1.168.192.in-addr.arpa" IN { (REVERSE IP ADDRESS DOMAIN SERVER)
type master;
file "reverse.zone"; (CHANGE YOUR REVERSE ZONE FILE NAME)
allow-update { none; };
};
SAVE AND QUITE the named.rfc1912.zones

Step 7:- Make a simlink named.conf to /etc folder

[root@dns etc]# ln -s /var/named/chroot/etc/named.conf /etc/named.conf
Go to /etc folder to check simlink
[root@dns etc]# ll named.conf
lrwxrwxrwx 1 root root 32 Apr 18 21:29 named.conf -> /var/named/chroot/etc/named.conf

Step 8:- Go to /var/named/chroot/var/named/ to Make Zone conf file

[root@dns etc]# cd /var/named/chroot/var/named/
Copy localdomain.zone to forword.zone
[root@dns named]# cp localdomain.zone forword.zone
And Copy named.local to reverse.zone
[root@dns named]# cp named.local reverse.zone

Step 9:-Edit forword.zone

$TTL 86400
@ IN SOA dns.example.com. root.dns.example.com (
42 ; serial (d. adams)
3H ; refresh
15M ; retry
1W ; expiry
1D ) ; minimum
IN NS example.com
dns IN A 192.168.1.2
That’s red line show the changes of the file SAVE AND QUITE


Step 10:-Edit reverse.zone file

$TTL 86400
@ IN SOA example.com. root.dns.example.com. (
1997022700 ; Serial
28800 ; Refresh
14400 ; Retry
3600000 ; Expire
86400 ) ; Minimum
IN NS dns.example.com.
2 IN PTR dns.example.com.
That’s red line show the changes of the file
SAVE AND QUITE the reverse.zone
 
Step 11:- Change ownership forword.zone and reverse.zone file
 
[root@dns named]# chown root:named forword.zone
[root@dns named]# chown root:named reverse.zone

Step 12:-Check entry in /etc/hosts file

[root@dns named]# cat /etc/hosts
# Do not remove the following line, or various programs
# that require network functionality will fail.
127.0.0.1 dns.example.com dns localhost.localdomain localhost
::1 localhost6.localdomain6 localhost6
192.168.1.2 dns.example.com dns ( YOUR DOMAIN NAME AND IP)


Step 13:-Check entry in /etc/resolve.conf

[root@dns named]# cat /etc/resolv.conf
search example.com ( YOUR DOMAIN NAME)
nameserver 192.168.1.2 (YOUR DOMAIN IP ADDRESS )
Step 14:- Restart the named service
[root@dns ~]# service named restart
Stopping named: [FAILED]
Starting named: [ OK ]

Step 15:- Check the name resolve

[root@dns ~]# dig dns.example.com
; <<>> DiG 9.3.3rc2 <<>> dns.example.com
;; global options: printcmd
;; Got answer:
;; ->>HEADER<<- opcode: QUERY, status: NOERROR, id: 29727
;; flags: qr aa rd ra; QUERY: 1, ANSWER: 1, AUTHORITY: 1, ADDITIONAL: 0
;; QUESTION SECTION:
;dns.example.com. IN A
;; ANSWER SECTION:
dns.example.com. 86400 IN A 192.168.1.2
;; AUTHORITY SECTION:
example.com. 86400 IN NS example.com.example.com.
;; Query time: 11 msec
;; SERVER: 192.168.1.2#53(192.168.1.2)
;; WHEN: Fri Apr 19 06:45:51 2013
;; MSG SIZE rcvd: 79
AND AFTER CHECK IP TO NAME

[root@dns ~]# dig -x 192.168.1.2

; <<>> DiG 9.3.3rc2 <<>> -x 192.168.1.2
;; global options: printcmd
;; Got answer:
;; ->>HEADER<<- opcode: QUERY, status: NOERROR, id: 35101
;; flags: qr aa rd ra; QUERY: 1, ANSWER: 1, AUTHORITY: 1, ADDITIONAL: 1
;; QUESTION SECTION:
;2.1.168.192.in-addr.arpa. IN PTR
;; ANSWER SECTION:
2.1.168.192.in-addr.arpa. 86400 IN PTR dns.example.com.
;; AUTHORITY SECTION:
1.168.192.in-addr.arpa. 86400 IN NS dns.example.com.
;; ADDITIONAL SECTION:
dns.example.com. 86400 IN A 192.168.1.2
;; Query time: 18 msec
;; SERVER: 192.168.1.2#53(192.168.1.2)
;; WHEN: Fri Apr 19 06:44:28 2013
;; MSG SIZE rcvd: 105 

 ------------------------------